Create full Microservice stack using JHipster Domain Language under 30 minutes
It’s been quite a while since I wrote a blog, I did a few some years ago but never really continued writing. So when I decided to start writing again, I didn’t have to think a lot about a topic as it was very obvious — JHipster.
我已经很长时间没有写博客了,几年前写过一些但没有坚持下来。所以当我现在决定重新开始写作时,根本不需要对博文的主题想太多了,因为很明显就是 - JHipster.
JHipster is a development platform for Java web applications and microservices development. If you are a JVM developer you might have already heard about JHipster. If not, well, you are missing out on a lot and I highly recommend you check it out. You can also check out my book “Full Stack Development with JHipster” on Amazon and Packt to learn about JHipster.
JHipster 是一个 Java web 应用和微服务的开发平台。如果您是一位 JVM 技术栈的开发者,可能已经听说过 JHipster 了。如果没有,好吧,你可能漏掉了些什么,我强烈建议你去看看。你也可以在 Amazon 或者 Packt 上购买我写的书 “Full Stack Development with JHipster” 去学习 JHipster.
I have been working on JHipster from April 2015 and the coolest feature that I got to implement so far is definitely multiple applications generation using JDL. This feature is available in the latest version of JHipster. If you are not familiar with JDL, I recommend you to check out the docs at https://www.jhipster.tech/jdl/
我从2015年4月份就开发 JHipster 了,至今为止,我认为最酷的功能就是 JDL - JHipster Domain Language , 也就是 JHipster 领域语言,它可以用来同时生成多个应用。JHipster 的最新版本支持这个功能。假如你不熟悉 JDL ,建议你去看一下文档 https://www.jhipster.tech/jdl/ 。
The E-Commerce application 一个电商应用例子
So let us see how we can create a microservice stack using JHipster. We will build an e-commerce store today. The stack includes-
- Service discovery using JHipster Registry, a Spring boot application that packs Eureka server and Spring cloud config server.
- API management and Gateway using Spring Boot, Netflix Zuul, ReactJS, and Swagger.
- Microservices using Spring Boot.
- Monitoring using JHipster Console which is made of the Elastic stack(ELK) and Zipkin.
让我们来看看如何用 JHipster 来创建全栈微服务应用。我们以一个电商应用为例。这个技术栈包括
- 服务发现用 JHipster Registry, 一个将 Eureka server 和 Spring cloud config server 打包的 Spring Boot 应用.
- API management and Gateway 用到 Spring Boot, Netflix Zuul, ReactJS, 和 Swagger.
- 微服务用 Spring Boot
- 监控用 JHipster Console ,整合了 Elastic stack ( ELK ) 和 Zipkin.
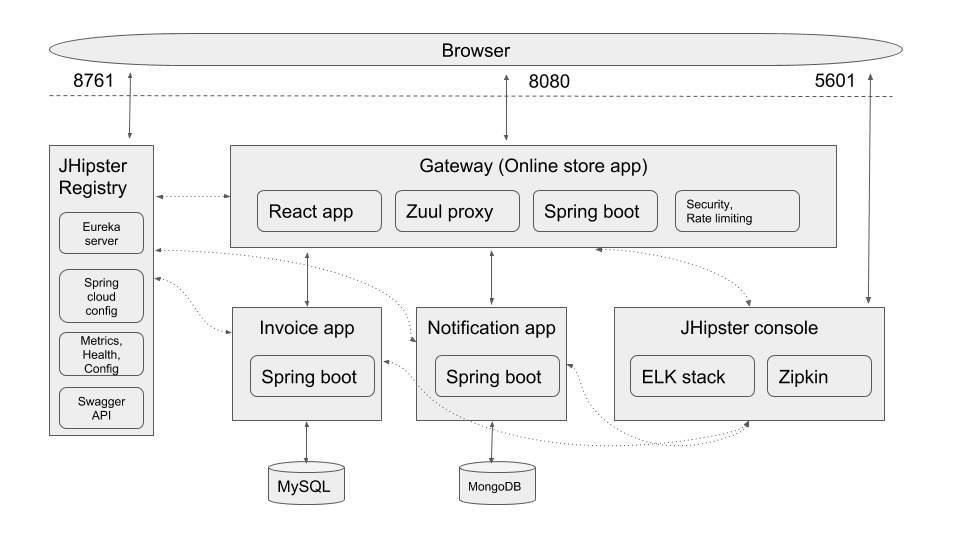
The Gateway routes requests to two microservices, Invoice application, and Notification application.
Gateway 将请求发送到 2 个微服务,Invoice application 和 Notification application.
Requirements 前置条件
In order to follow this tutorial, you would need a recent version of Docker, Docker-compose, NodeJS and Java 8 installed on your computer. The below are the versions I have installed.
为了能够跟进下面的试验,你需要在你的电脑上安装好新版的 Docker, Docker-compose, NodeJS and Java 8 ,下面是我电脑上的各个软件的版本
1 | docker -v |
First, install the latest version of JHipster
首先,安装最新版的 JHipster
1 | npm install generator-jhipster -g |
Verify that you have version 5.3.4 or above by running
验证你的 JHipster 的版本 >= 5.3.4
1 | jhipster --version |
Creating the JDL 创建 JDL
Now let us create our JDL. Head over to the JDL Studio(use the older version for now as JDL 3 update is not released for the new JDL studio yet) or your favorite IDE/Editor(You can use JHipster IDE plugin if you like).
现在让我们来创建 JDL,可以用 JDL Studio(现在先用老版本,因为 JDL 3 还没有 release),或者用你喜欢的 IDE/Editor (假如你喜欢,也可以用 JHipster IDE plugin).
First, let us define our applications. We will start with the Gateway
首先,让我们定义 applications,我们先从 Gateway 开始
1 | application { |
Most of the options are self-explanatory, we are building an application named Store of type Gateway with JWT authentication and Eureka-based service discovery. The application uses a MySQL database and Hazelcast for the cache. It’s built using Gradle. For the client-side, it uses React and Sass. It also has Protractor for end-to-end testing.
At the end of the definition you can see
entities *, we will come to this later.
大多数定义项都很浅显易懂,无需太多解释。我们创建了一个类型为 Gateway , 认证类型为 JWT , 服务发现使用 Eureka ,名字叫做 Store 的应用。
数据库系统为 MySQL ,缓存为 Hazelcast ,一个分布式缓存系统,https://hazelcast.com/ 。
使用 Gradle 来构建应用。
在客户端,我们采用 React and Sass,另外,端到端的测试采用 Protractor 框架。
在定义项的末尾,你会看到 entities * ,这个我们稍后再解释。
Now let us define our Invoice microservice
现在让我们来定义 Invoice microservice
1 | application { |
It follows similar options like our Gateway and since it is microservice it doesn’t define any client-side options and also skips user management as it will be handled by the Gateway. Additionally, we have also mentioned a custom port 8081 since we do not want this application to conflict with the default port 8080 used by the Gateway.
定义项与 Gateway 差不多,但因为它是一个微服务,所以它没有定义任何客户端的选项,同时也没有定义用户管理的相关选项 ( 如:认证方式 ),用户管理是由 Gateway 来完成的。另外,我们定义了此微服务应用的端口 8081 ,以避免和 Gateway 默认的 8080 端口冲突。
Now let us define the second microservice, the Notification application
现在让我们定义第 2 个微服务,Notification application
1 | application { |
This application follows many options similar to the Gateway and Invoice application but instead of using MySQL it uses MongoDB as its database and also disables cache.
这个微服务应用的定义与 Gateway 和 Invoice 应用也差不多,不同的是我们的数据库系统从 MySql 换成了 MongoDB ,同时将其缓存设置为 false .
Now that our application definitions are done, we will proceed to define our entity model.
我们的应用定义已经完成了,现在让我们来定义实体( entity )
1 | /** Product sold by the Online store */ |
The JDL defines the entities, enums, the relationship between entities and options like pagination and service layer.
JDL 定义了实体( entities ),枚举( enums ),以及实体间的关系,另外还有一些分页( pagination ) 和服务层(service layer) 的选项
The entity field definition follows the syntax
实体字段的定义遵从的语法规则
1 | entity <entity name> { |
The relationship definition follows the syntax
实体间关系定义遵从的语法规则
2
3
4
5
<from entity>[{<relationship name>[(<display field>)]}]
to
<to entity>[{<relationship name>[(<display field>)]}]
}
Refer the JDL docs for full DSL reference.
全部的 DSL reference, 请参见文档 JDL docs
The Invoice microservice application has the following entities
Invoice microservice 实体定义
1 | entity Invoice { |
Pay attention to the last microservice option declared here, it specifies that these entities belong to the microservice named invoice so that our Gateway knows where to route requests for these entities.
请注意最后的 microservice 选项定义,它指明了这些实体( Invoice, Shipment ) 是属于名字叫 Invoice 的微服务的,所以我们的 Gateway 就会知道如何去路由对这些实体的请求。
Now let us see the entities for the Notification microservice application
现在我们看一下 Notification microservice 的实体
1 | entity Notification { |
Now let us go back to the entities keyword we used in our application definitions.
现在让我们回到之前提到过的,在我们之前定义的应用中的 entities 关键字
1 | application { |
Here we instruct the store gateway application that it should contain all the entities defined in the JDL and the gateway will know to skip server-side code for the entities that belong to another microservice and hence will only generate the client-side code for those, here namely Invoice, Shipment, and Notification. We also instruct the Invoice application and Notification application to include its entities.
这里我们指明了 Store gateway 应该包括在 JDL 定义的所有的实体,并且此 gateway 会知道这些实体都是属于其它微服务的,所以它会跳过服务端 ( server-side ) 的代码生成,而只是生成客户端 ( client-side ) 的代码。具体的实体就是 Invoice, Shipment, and Notification. 同时我们也指明了 2 个微服务包含的实体。
Generating the applications 生成应用
Create a folder where we want to create our microservice stack.
创建一个新的文件夹,用来生成我们的的整个微服务栈。
1 | mkdir ecommerce && cd ecommerce |
Now, let us put everything together into a JDL file. Let us call it
app.jdland save it into this folder.
现在,让我们将所有的定义放到一个 JDL 文件中,起名叫 app.jdl, 保存到文件夹中。
1 | application { |
Now let us invoke JHipster CLI to import this file
现在让我们用 JHipster CLI 去 import 这个文件。
1 | jhipster import-jdl app.jdl |
This will create the store, invoice and notification folders and will do the below in each of the folders
- Generate the appropriate application and entities configuration.
- Generate the application and entities source code based on the configurations.
- Install the NPM dependencies for the application.
命令会创建 store, invoice and notification 3 个文件夹,并且在每一个文件夹中做如下一些事情。
- 生成应用和实体的配置
- 根据配置,生成应用和实体的代码
- 安装 NPM dependencies ( 注:JHipster 自身运行需要的依赖,以及应用的依赖。)
Once the process is complete you should see the below on your console
运行结束时,应该在 console 上看到如下信息
1 | Entity Product generated successfully. |
Walk around the generated code to familiarize yourself.
查看生成的代码,熟悉它们~
Running the applications with Docker 运行应用
Now that our applications are created its time to test them locally using Docker. To do this first let us generate some docker compose configurations using JHipster.
现在我们的应用已经创建完成,是时候在本地用 Docker 来运行测试它们了~ 首先,让我们用 JHipster 来生成 docker compose 的一些配置。
Create a new folder inside the ecommerce folder and run the JHipster docker-compose command
( 在当前目录下 ) 创建一个新的 ecommerce 文件夹,然后运行如下 docker-compose 命令。
1 | mkdir docker-compose && cd docker-compose |
It will prompt you with a few questions, choose the answers as highlighted below
它会提示你几个问题,选择项如下。
🐳Welcome to the JHipster Docker Compose Sub-Generator 🐳
Files will be generated in folder: /home/deepu/workspace/temp/ecommerce/docker-compose
✔ Docker is installed
? Which type of application would you like to deploy?
Microservice application
? Which type of gateway would you like to use?
JHipster gateway based on Netflix Zuul
? Enter the root directory where your gateway(s) and microservices are located ../
3 applications found at /home/deepu/workspace/temp/ecommerce/
? Which applications do you want to include in your configuration?
invoice, notification, store
? Which applications do you want to use with clustered databases (only available with MongoDB and Couchbase)?
MongoDB
? Do you want to setup monitoring for your applications ?
Yes, for logs and metrics with the JHipster Console (based on ELK and Zipkin)
? You have selected the JHipster Console which is based on the ELK stack and additional technologies, which one do you want to use ?
Zipkin, for distributed tracing (only compatible with
JHipster >= v4.2.0)
JHipster registry detected as the service discovery and configuration provider used by your apps
? Enter the admin password used to secure the JHipster Registry
admin
This will generate all the required docker-compose configurations for the stack and will also print out further instructions to build the docker images.
它会生成全部 docker-compose 配置,并且会打印出后续的指导,如:怎样构建 docker 镜像等等。
Note: In the latest JHipster versions we migrated to using Jib for creating Docker images. This is a huge improvement over the Docker Maven plugin that we were using, as a result the command to create an image has changed to
./gradlew -Pprod bootWar jibDockerBuild.
注意:在最新版的 JHipster 中,我们已经整合了 Jib 来创建 Docker 镜像。这个相对以前我们使用的 Docker Maven plugin 来说,是一个很大的进步!创建镜像的命令更改为
1 | ./gradlew -Pprod bootWar jibDockerBuild |
1 | Docker Compose configuration generated with missing images! |
(
译者注 :最新版的命令又有新的变化,具体可以
- 参考上面所述,命令完成后,打印出后续的指导 ,会打印出相关的命令
- 查看官方文档 https://www.jhipster.tech/docker-compose/#-building-and-running-a-docker-image-of-your-application
)
Follow the instructions and build the docker images. Once all 3 images are built run the below command from the docker-compose folder to fire everything up.
根据相关的指导完成 docker 镜像的创建,完成 3 个镜像的创建后,在生成的 docker-compose 文件夹中运行如下命令来启动所有的应用。
1 | docker-compose up -d |
Once the containers start you can stream the logs using below command
一旦容器开始启动,你就可以用以下命令来查看、跟踪日志( logs )
1 | docker-compose logs -f |
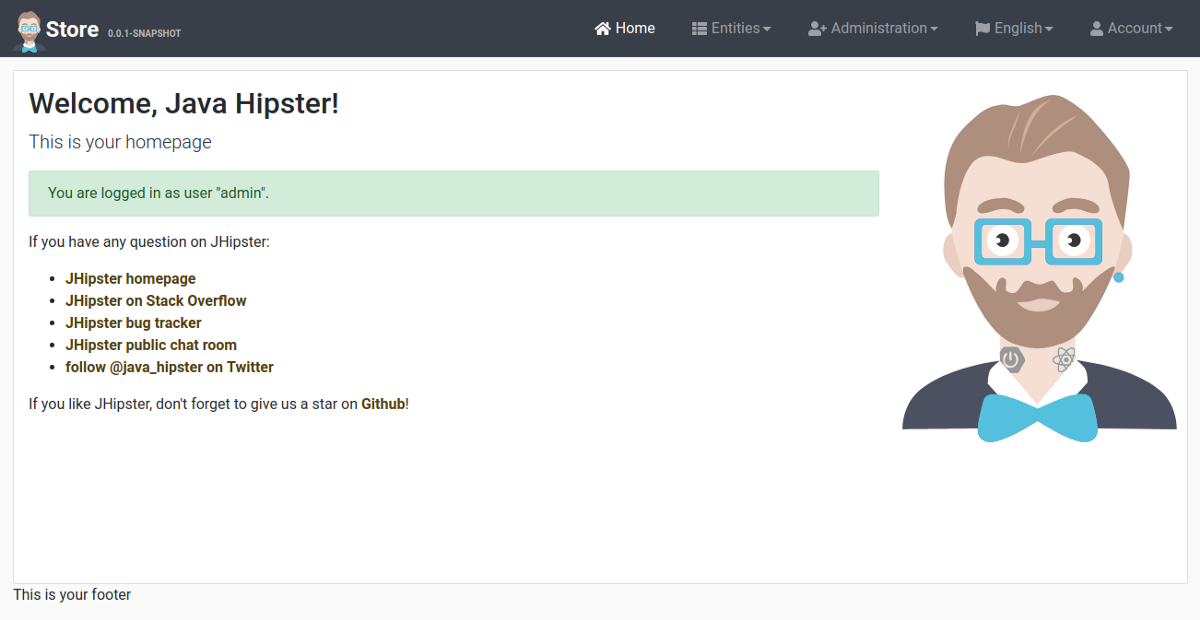
Now point your favorite browser to http://localhost:8080/ and see the E-Commerce microservice application in action.
( 正确启动完成后 ) 用你喜欢的浏览器打开 http://localhost:8080/ 可以看到 E-Commerce 微服务应用正在运行了~
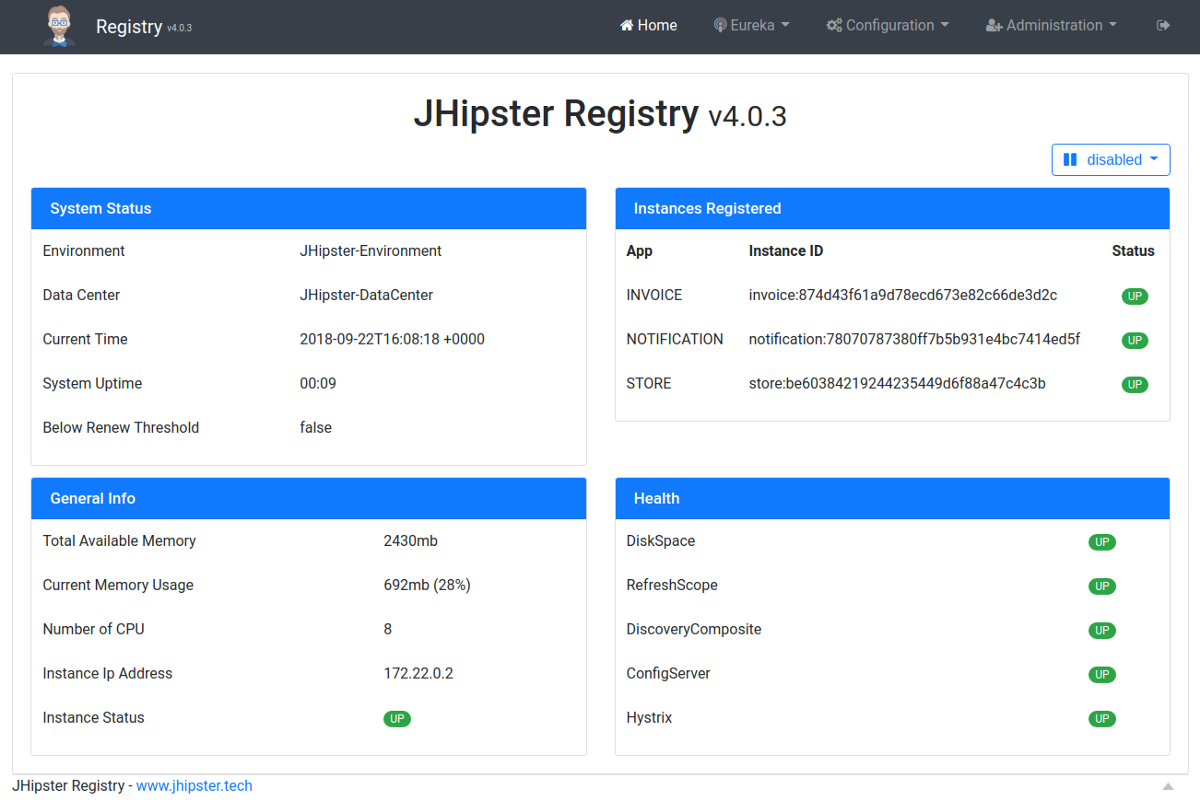
You can see the JHipster registry in action at http://localhost:8761/
你可以看到 **JHipster registry ** 正在运行,http://localhost:8761/
And finally the JHipster console at http://localhost:5601/
最后,JHipster console at http://localhost:5601/
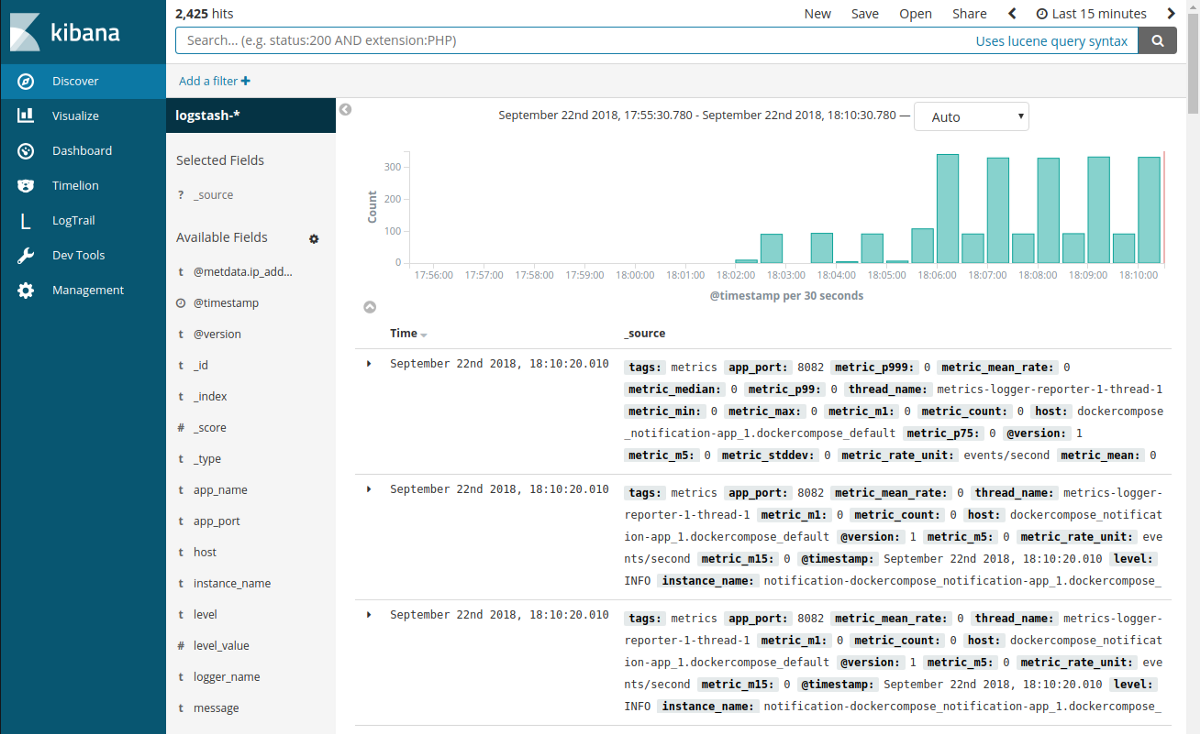
Once you are done playing around, you can shut everything down by running the below command on the docker-compose folder
当你运行、测试完毕时,可以在 docker-compose 文件夹运行如下命令来关闭( shut everything down ) 所有的应用。
1 | docker-compose down |
后记
Hope you had fun creating microservices using JHipster. To learn how to convert a JHipster monolith to microservices check out my book “Full Stack Development with JHipster” on Amazon and Packt.
希望你能在运用 JHipster 创建微服务的过程中得到乐趣~ 想进一步学习如何将一个单体应用改造成微服务应用,请参考 Amazon 和 Packt 上面我写的书 Full Stack Development with JHipster 。
If you like JHipster don’t forget to give it a star on Github.
如果你喜欢 JHipster,请不要忘记在 Github 上给出你的 star
英文原文 Create full Microservice stack using JHipster Domain Language under 30 minutes